[ PC Version ] [ Mac Version ] [ Print Version ] [ Print Version ] [ Back to Mac User Guide ] [ Back to PC User Guide ]
Create a New Timeline | Open a Timeline | Save a Timeline | Save As a Web Page | Playback | Timepoints | Markers | Bubbles | Adding Labels | Annotations | Sizing | Edit Properties | Printing
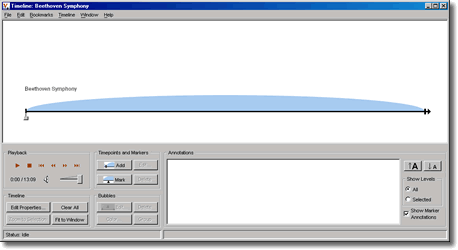
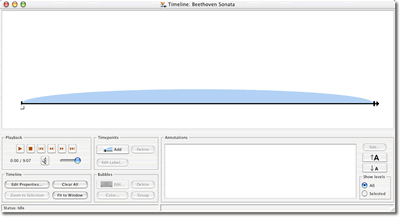
The Timeline tool may be used to create a diagram of the formal structure of a piece of music. Structural segments appear as "bubbles" when timepoints are added to a timeline. You may add labels and annotations to bubbles as well as adjust various bubble properties such as color and shape. Timelines may be created for a wide variety of audio file types (mp3, aac, mid, aiff, wav, mov, m4a, and mp4). Individual timelines may be printed out or saved for future use.
You may create a new Timeline by starting the Timeline tool and selecting the "Create a New Timeline" button. Once you locate the desired audio file, the timeline window will display a simple timeline with a single bubble. When a timeline is open, you can create another timeline by selecting File on the menu and then select New Timeline.
You can now diagram the structure by adding timepoints, bubbles, markers, labels/annotations, and modifying the timeline properties and timeline size. Once you are done, you may save the timeline and/or print it out.
To open an existing Timeline (.v2t) file use one of the following methods:
- From the File menu, pick "Open" and then "Timeline...".
- Double-click on any timeline file saved in a local computer folder, or on a disk, and it will open directly in the Timeline tool.
- If you also have Variations installed, double-clicking the timeline file may open the file using Variations, which will require logging in first. To avoid this, right-click on the timeline file, select "Open With" and pick Variations-Audio-Timeliner.To avoid this, control-click on the timeline file, select "Open With" and pick Variations Audio Timeliner.
A timeline may be saved and reopened by selecting either "Save Timeline" or "Save Timeline As..." from the File menu. Saving a timeline via the File menu results in a file with a ".v2t" extension and a timeline icon.
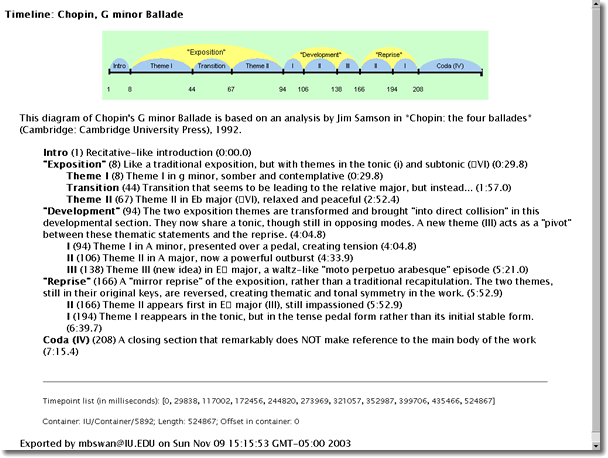
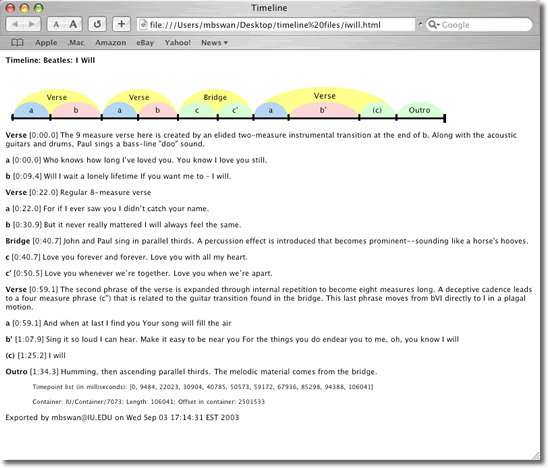
A timeline can also be saved as a Web Page, or ".html" file. To save as a Web page select "Save as Web page" from the File menu. The Web page (.html file) will contain the following information:
- the timeline title
- a small graphic of the timeline (a .gif file)
- the timeline description
- a list of bubble, marker and timepoint labels and annotations
- other information about the timeline including the author and date/time the file was saved
(Click image to see larger view)
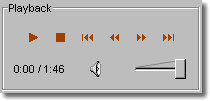
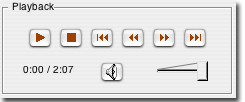
Use the fast forward 
 and rewind
 controls to simply rewind and fast forward the slider along the timeline. Use the
previous track
controls to simply rewind and fast forward the slider along the timeline. Use the
previous track 
 and next track
 controls to jump the slider and playback from bubble to bubble.
Timepoints represent boundaries for structural segments of a work. For example, use timepoints to mark the beginning of phrases or sections. Bubbles appear in between timepoints.
- Adding - There are several ways to add a timepoint:
- Press the "Add" button

 either while the slider is stopped or as it is moving
along the timeline.
either while the slider is stopped or as it is moving
along the timeline. - Double-click directly on the timeline.
- Press the Enter key.
- Select "Add" from the Timepoint submenu of the Timeline menu.
- Press the "Add" button
- Selecting - To select a timepoint, position the cursor directly over the timepoint (the cursor should change to a left/right arrow). Click on the timepoint to select it. You cannot select multiple timepoints.
- Moving - To move a timepoint, select and "drag" it to a different location on the timeline. As a timepoint is moved, bubbles associated with it will adjust accordingly.
- Delete - To delete a Timepoint, select it and click the Delete button or press the delete key on the keyboard. You may also select the "Delete" option from the Timepoint submenu of the Timeline menu.
- "Clear All" - Pressing the "Clear All" button will remove all current timepoints (and bubbles) and markers. If you press "Clear All" there will be a warning message before the timeline is cleared. You may also clear everything by right-clicking (command-clicking) on the timeline and selecting "Clear All" or by selecting "Clear All" from the Timeline menu.
Markers can be used to mark specific events without creating formal boundaries (for bubbles).
- Adding - There are several ways to add a marker:
- Press the "Mark" button

 either while the
slider is stopped or as it is moving along the timeline.
either while the
slider is stopped or as it is moving along the timeline. - Press Ctrl + Enter.
- Select "Mark" from the Timepoint submenu of the Timeline menu.
- Press the "Mark" button
- Selecting - To select a marker, position the cursor directly over the marker (the cursor should change to hand). Click on the marker to select it. The cursor will move over the top of the marker and the marker will change to white. You cannot select multiple markers.
- Moving - To move a marker, select and "drag" it to a different location on the timeline.
- Delete - To delete a marker, select it and click the Delete button or press the delete key on the keyboard. You may also select the "Delete" option from the Timepoint submenu of the Timeline menu.
- "Clear All" - Pressing the "Clear All" button will remove all current timepoints (and bubbles) and markers. If you press "Clear All" there will be a warning message before the timeline is cleared. You may also clear everything by right-clicking (command-clicking) on the timeline and selecting "Clear All" or by selecting "Clear All" from the Timeline menu.
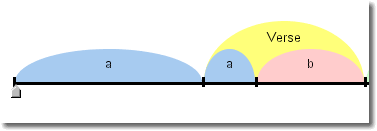
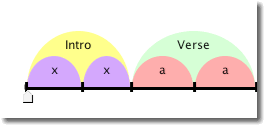
Bubbles are the time-spans between timepoints on the line which may be used to represent the phrases, periods, or larger formal sections of music. The visual properties of bubbles can be edited to better show relationships between sections or to suit personal preferences. Bubbles may also be grouped hierarchically.
- Selecting - In order to edit bubbles, you must first select them.
To select a single bubble, just click on it. To select multiple bubbles you may:
- Shift-click to select contiguous bubbles: select one bubble, press and hold down the 'Shift' key (on the keyboard), then click on another bubble. All of the bubbles in between will be selected.
- Control-click to select non-contiguous bubbles: select one bubble, press and hold down the 'Ctrl' key (on the keyboard), then click on other bubbles. Only the bubbles you click will be selected.
- Drag a box around the bubbles you want to select by clicking anywhere outside of the bubbles then dragging a box over them.
- Use any of the above methods in combination.
- Grouping - Select the bubbles that you would like to group together (as described in the previous section) and then click the "Group" button. "Group" is also available by right-clicking (command-clicking) on a selected bubble and choosing "Group Bubbles" from the resultant menu, and via the "Bubbles" submenu of the Timeline menu.
- Color - You may change the background color of the entire timeline,
or the color of individual bubbles or bubble levels. Change the background color by
selecting "Change Background Color" from the Timeline menu, or by
right-clicking (command-clicking) anywhere on the timeline background area. There are
several ways to change bubble colors:
- Change the color of individual bubbles by selecting the bubble(s) and clicking the "Color..." button. The colors which you have most recently selected will be available in the palette on the right. Press "Reset" in the box to Undo a current color selection.
- Change the entire timeline color scheme to Black & White via the "Edit Properties..." dialog box.
- Change the default bubble level colors in the "Edit Properties..." dialog box.
- Right-click (Command-Click) on a bubble or a selected group of bubbles and choose "Change Color" or "Set Level Color" from the menu.
- Select the bubble(s) you want and choose either "Change Color" or "Set Level Color" from the Bubbles submenu of the Timeline menu.
- Shape - The default bubble shape is rounded. To change to square bubbles select the "Edit Properties..." option from the Timeline menu or open the "Edit Properties" dialog box by clicking the "Edit Properties" button. Select the "Square Bubbles" radio button in the "Bubble Shape" area.
- Delete - To delete a bubble, first click on it. It will change color to indicate it has been selected. Press the "Delete" button or right-click (command-click) the bubble and choose "Delete" from the menu.
- - You may adjust the default bubble in the "Edit Properties..." dialog
box. Move the slider along the scale from small to large.
- Level - You may adjust the level of a bubble. (For example, you might want similar sections of a work to have the same level.) To do this, select the desired bubble(s) and choose "Move Up a Level" or "Move Down a Level" from either the right-click (command-click) popup menu or the Bubbles submenu on the Timeline menu (Ctrl-Up and Ctrl-Down will also work). Note that level adjustments will only be made if there is "room" for the bubble(s) to move in that direction.
Bubbles - Short, descriptive labels may be placed directly on bubbles or below timepoints. Bubble labels might be used to indicate phrase form (A, B, a, a', b''), name larger sections ("Exposition", "Coda", "Variation II"), or to describe the bubble contents more generally ("repeated", "inversion", "transitional", "octatonic", "5", etc.). Timepoint labels might be used for measure numbers or cadence types. There are several ways to add a bubble label:
- Select a bubble and click the "Edit..." button
 to enter the text in the Edit Bubbles dialog box.
 - Right-click (Command-Click) (control-Click) the selected bubble and choose "Edit..." from the menu.
- Choose "Bubble(s)" from the Timeline menu and select "Edit..." from the resulting menu.
- Double-click a bubble to open the Edit Bubbles dialog box.
Use the Edit Bubbles window (shown below) to add/edit bubble labels and annotations (rather than timepoint labels or marker labels. You may use the bubble playback controls (these play only the current bubble) just as you would in the timeline window, but you also have the option to loop playback of a certain bubble as you label or annotate.
You may also navigate from bubble to bubble directly within the window in order to add labels, rather than clicking back and forth from the timeline. Use the Up, Down, Left and Right controls in the "Select Another Bubble" pane to navigate the bubbles.
Markers - Marker labels (different from bubble labels or timepoint labels) may be added in several ways:
- Open the edit marker label dialog by selecting the marker and clicking the "Edit..." button;
- Choose "Edit Label…" from the Timepoints submenu;
- Choose ""Edit…"" from the right-click (command-click) menu;
- Double-click on the marker.
Add an annotation to a marker in the same window. Move back and forth between markers using the "Previous" and "Next" buttons at the bottom of the window. Check/uncheck the "Show Marker Annotations" box in the annotations pane to control whether marker labels are displayed in the annotation pane as the slider moves past them during playback.
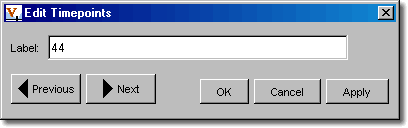
Timepoints - Timepoint labels (different from bubble labels and marker labels) may be added in several ways:
- Open the edit timepoint label dialog by selecting the timepoint and clicking the "Edit..." button;
- Choose "Edit Label..." from the Timepoints submenu;
- Choose "Edit..." from the right-click (command-click) menu;
- Double-click on the timepoint.

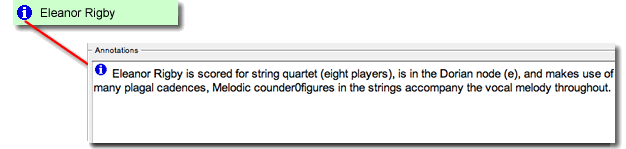
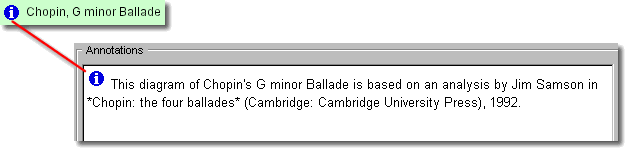
- Adding Annotations - Annotations may be attached to individual bubbles and markers. Annotations allow you to write complete sentences that describe the musical events or processes that take place in the current bubble or that are associated with a marker. For example, annotations might be used to describe melodic or thematic characteristics, discuss motivic transformations, explain unusual modulations or chord progressions, give the text and translations for vocal music, or just describe generally what is going on. The annotations that you create will be displayed during playback in the annotation pane. Add annotations in the same respective window used to add bubble labels and marker labels.
-
Timeline Description
- You may create or edit a timeline description in the Edit
Properties window. If one already exists, it will appear in the annotation pane
when the timeline file is opened. You may also view it by pressing the information
button next to the timeline title.
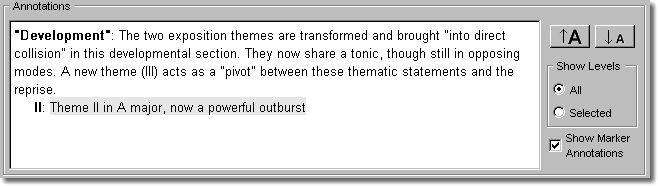
- Annotation Display Options - You may adjust the way that annotations are displayed in the annotation pane. You may increase or decrease the font size, and also choose which levels of annotations to display. In the example below, the "All" option for the "Show levels" radiobutton is selected. Thus, annotations for all bubble levels are displayed. If the "Selected" option is chosen, only annotations for the selected bubble level(s) are shown. The highlighted/grayed annotation indicates the bubble that is currently selected in the timeline. In this pane you may also choose whether to display marker annotations during playback by checking/unchecking the "Show Marker Annotations" box.

You may adjust the size and appearance of a timeline in several ways. For instance, you may zoom in and out of a timeline selection, create smaller "excerpt" timelines, or manually resize the timeline.
- Manual Resize - To manually change the timeline size, place the cursor over the arrow on the right end of the timeline. When you cursor changes to a hand, drag it left or right until the timeline is the desired size. To set it back to its original size press the "Fit to Window" button.
- Zoom to Selection - You may enlarge a portion of the timeline in order to better see labels or make more detailed changes to timepoints. To do this, select the range of bubbles you would like to zoom in to, and click "Zoom to Selection". The selected range of bubbles will fill the viewing area. To set it back to its original size, press the "Fit to Window" button.
- Create Excerpt - You may want to create an excerpt of your timeline diagram. For example, you might want to create a separate, more detailed diagram of just the "development section" bubble in your timeline. To do this, select the bubble or range of bubbles you want in the excerpted timeline. Right-click (Command-Click) and select "Create Excerpt", or select "Create Excerpt" from the Timeline menu. A new timeline will automatically be created that contains only that selection.
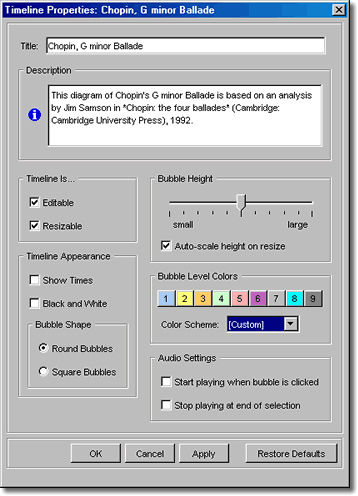
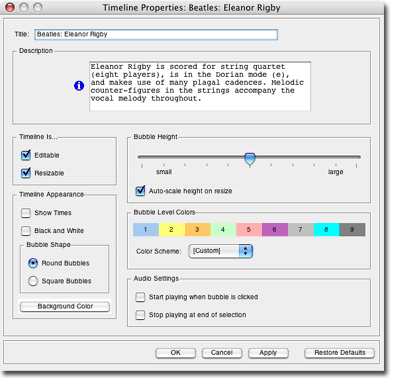
To open the Edit Properties window (shown below), click on the "Edit Properties..." button in the Timeline panel. Alternatively, you may select "Edit Properties..." from the Timeline menu, or right-click (command-click) on the slider and select "Edit Properties..." from the resulting menu.
Within the Edit Properties box, you may adjust overall properties of the timeline appearance and performance. You may change the title and description, adjust bubble level colors, choose a color scheme (including one for color-blind users), change bubble shape and , adjust the audio settings, choose to show times under timepoints, and decide whether the timeline should be editable and resizable. Press "Restore Defaults" to reset all properties you have adjusted.
To print out a timeline, simply choose the "Print..." option from the File menu in the Timeline window. A Print dialog box will appear from which you may choose to print in Black & White OR Color/Grayscale.